
For anyone just starting out with crocheting, reading a pattern is one of the areas you might struggle with. Every crochet designer has a different technique and style for writing out their patterns, but typically a well-written crochet pattern will have all of the same components. Knowing what these components are, and how to follow along, will go a long way with understanding how to read crochet patterns and creating a fabulous finished piece.
At The Crocheting, we offer fast pattern support, and while you can always reach out with any questions you have as you work, understanding the basics to reading a crochet pattern could help you answer these questions yourself, and grow your cro-confidence!
In this article, we will use our Auburn Top Crochet Pattern as a demonstration for how to read and create one of our crochet patterns.

All of our crochet patterns begin with a title slide. Here, you can see an up-close photograph of the piece you are making, as well as its name. Below every slide throughout the pattern, you will find our social media handles, as well as our email address to reach out to if you have any questions along the way.
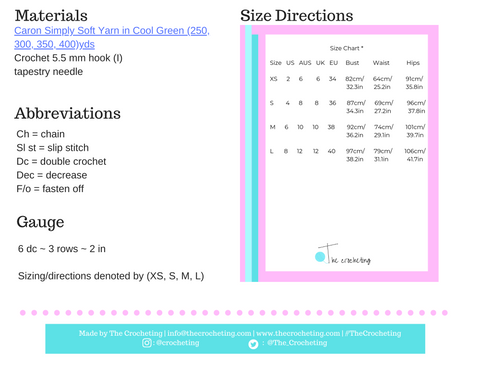
The second page of the pattern holds a lot of the information you will need to start working on your pattern. Here, you'll find the list of necessary materials, abbreviations for stitches, gauge, and size chart. Let's break down each of these sections to know exactly what we will need to figure out before starting this project:

First we see the Materials section. This pattern is using a Caron Simply Soft Yarn, which we can click into to find a link to purchase the exact yarn used, or to see the type of yarn this is, so we can check out what we already have at home.
We'll then look to these numbers (250, 300, 350, 400) to see if we have enough yarn to make the size we want. Since the numbers go in order of the size increases, we will need anywhere from 250 to 400 yards, depending on the size, to complete this project.
We also can see that this pattern requires a 5.5mm crochet hook, and a tapestry needle, so we will make sure we have both of these on hand, as well.

Moving onto the Abbreviations section, we see that in this pattern, we will be using the chain stitch, the slip stitch, the double crochet stitch, the "decrease" technique, and we will be fastening off.
These abbreviations mean that going forward with the pattern, these stitches will be shortened to "ch, sl st, dc, dec, f/o" instead of their longer form. This is also a great point in the pattern to make sure you are comfortable with making all of the given stitches. If there is one or more that you are not familiar with, consider searching up a YouTube or written tutorial explaining that stitch, or reach out to the pattern designer directly for advice.

Lastly, we see the Gauge section. Here, the pattern is advising that, when making a square that is six double-crochets wide, and three completed-rows tall, that square should measure about 2 inches in length and width.
Gauge is important because it lets us know if our work will match up in size to the pattern designer's.
For example, let's say you make a crochet square that is 6 double-crochets wide, and 3 rows tall, but this square is only 1.5 inches tall and 1.5 inches wide. This means that you will actually need more stitches and more rows to get to the correctly-sized project.
Tips for adjusting your gauge include changing to a thinner or thicker yarn, going up or down a crochet hook size, or simply following the instructions to make a smaller or larger size.
We also see here that the sizing directions throughout the pattern are given in the format: (XS, S, M, L). This means that, wherever throughout the pattern you find numbers written out in parentheses, you should only look to the one that corresponds to the size you are making. For example, if you choose to make a size medium (M), you would locate the 3rd number in the list and make sure your stitch count matches up with this number.

Now that we have our materials, abbreviations, and gauge, we can move into working on this project.
The rest of the pattern is divided into sections, meant to be started on the first section (in this case the "Top Base") and worked until the end of the pattern.
Each section is divided into Rounds. One round means one completed step in the section of the pattern. We also see a small note underneath the section title that tells us this Top Base is worked from the bottom, up. Notes like this one will appear throughout the pattern where it is helpful to get a sense of how your project is being constructed.
If we are making a size L, we'll be reading Round 1 of the Top Base as, "Chain 124. Slip stitch into your first chain to form a ring."
With our completed Round 1, we then move onto Round 2, where we are reading it as "Chain 2 (counts as a double-crochet), double crochet in the next chain from your hook and in each chain, around." Note here that the pattern is telling us to start off with a chain of 2, which we are going to treat as a double-crochet stitch.
Round 2 finishes by stating "Slip stitch into your first double-crochet stitch to close the round." Which means that, once we've successfully double-crocheted into every chain around the entire loop, we will slip stitch into the top of our first double-crochet (in this case, the top of our chain-2), and that will be a complete round.

We would continue to move through the pattern, until we complete the entire Top Base, and then the "Straps" section. Notice, too, how the "Straps" section directs us to make two straps. For some patterns there are certain sections will need to be repeated, so it is important to look to the title of each section for any guidance on repetition.
At the end, we move into the "Assembly" portion of the pattern. This is the part in which we should have all of our pieces together, and can now begin to use our tapestry needle, and some extra yarn, to sew all of our pieces to form the finished project. Here, we see where we sew our Straps to our Top Base actually changes from size to size, so it is still equally important to follow the size directions, even at the Assembly level.

When we complete our assembly, we can find more photographs of the finished project, and we will be able to compare our work against these photos to see how it turned out.
And that is really all there is too it! At The Crocheting, we know that some crochet patterns might be trickier than others. If you're just starting out with crocheting, try visiting our Beginner Pattern section to pick out some of the simpler projects and test your pattern-reading skill set. If you're already a pro, you can give our Intermediate or Advanced Pattern sections a try.
And no matter what your crochet skill level, you can always reach out to us directly with any questions at info@thecrocheting.com for a quick response!